Tutorial: Setting Different Alert Thresholds for Devices of the Same Model
In certain scenarios, the alert thresholds for devices derived from one model may be different due to their specifications. For example, a threshold with a maximum current has to fluctuate in value for different devices, as each device has a distinct maximum current.
Scenario
In this scenario, we will set different alert thresholds for 2 devices of a same type by configuring the thresholds as their attributes. Next, we will select the attribute as the condition to trigger the alert.
The details of this scenario is as follows.
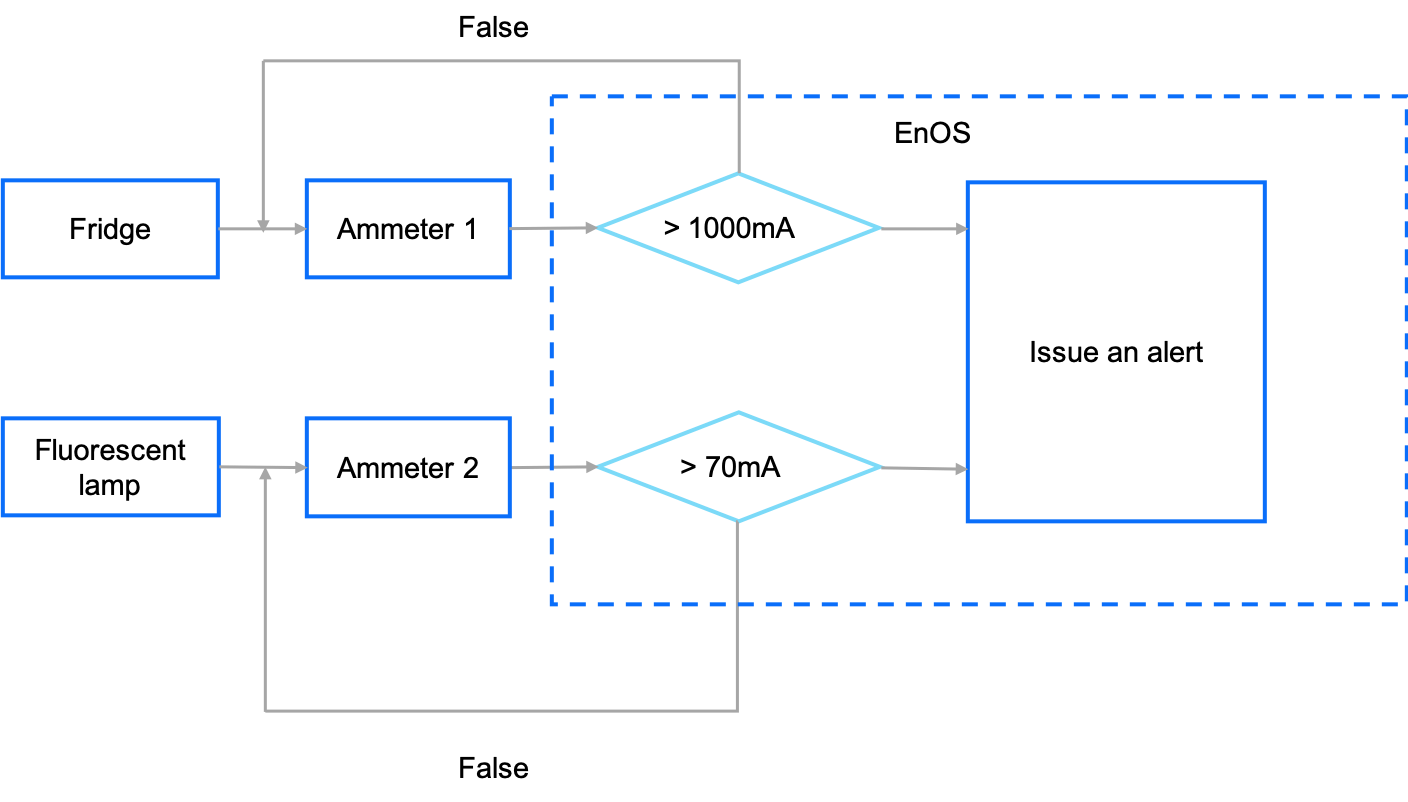
In a smart building, we will use two ammeter of the same type to measure the currents that goes through a fridge and a fluorescent lamp. An alert will be triggered when the ammeter detects that the current is above the maximum current allowed for the fridge or the lamp. Let us suppose the maximum current allowed for the fridge is 1000 mA and the fluorescent lamp is 70mA.
Therefore, we will set different alert thresholds for the 2 ammeters so that both of them will alert us when the current is above the maximum current of the device they are gauging.
Before You Start
Ensure that you have the access to the model, asset management, and alert services. If not, contact your OU administrator. For more information, see Policies, Roles and Permissions.
Step 1: Setting up the Development Environment
We will use the EnOS Device SDK for MQTT for Java to simulate the sending of data from the two ammeters to EnOS. To install EnOS Device SDK for MQTT for Java, Java SE 8 and Maven 3 are required. Take the following steps to set up your development environment.
Install JDK, which can be downloaded at https://www.oracle.com/technetwork/java/javase/downloads/jdk8-downloads-2133151.html.
Install Maven, which can be downloaded at http://maven.apache.org/download.cgi.
Install a development environment, such as IntelliJ IDEA, which can be downloaded at https://www.jetbrains.com/idea/download/.
Create dependency on EnOS Java SDK for MQTT in the pom.xml of your project.
<dependency>
  <groupId>com.envisioniot</groupId>
  <artifactId>enos-mqtt</artifactId>
  <version>2.1.2</version>
</dependency>
Step 2: Create a Ammeter Model
For steps on how to create a model, see Creating a Model. Define the model as follows.
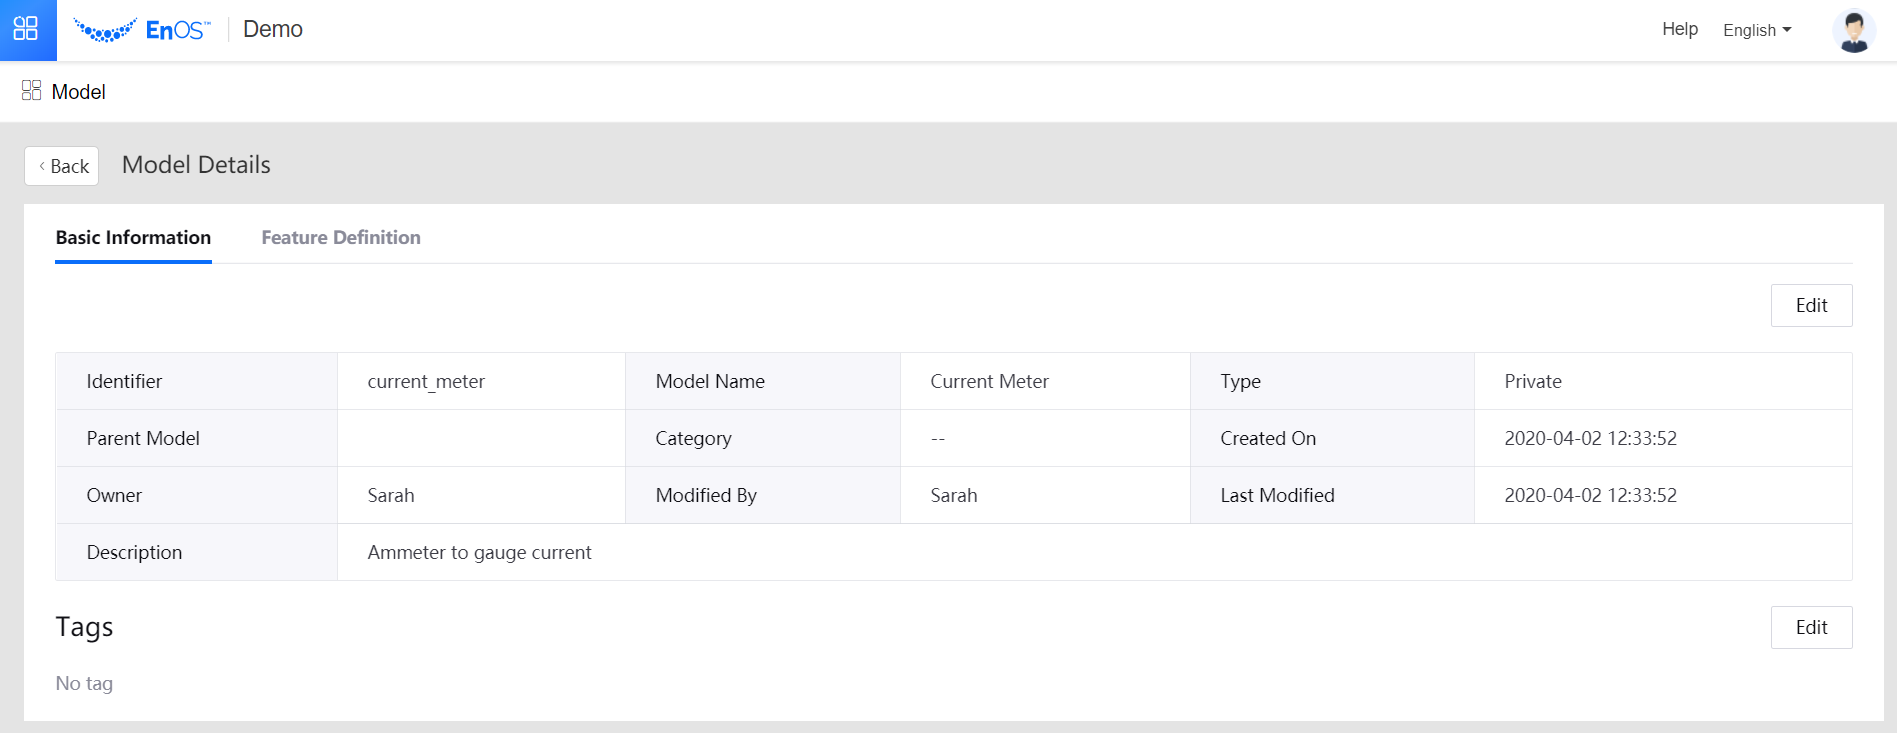
Model Information¶ Field Value Identifier current_meter Model Name Current Meter Created From No Source Model No Description Ammeter to gauge current
Feature Definition¶ Field Element 1 Element 2 Type Attributes Measurement Points Name Max current allowed Real-time current Identifier max_current rt_current Data type double double Unit Electric Current: milliampere | mA Electric Current: milliampere | mA
The created model is as follows.

Step 3: Create Product for Ammeter
For steps on how to create a product, see Creating a Product. Define the product as follows.
| Field | Value |
|---|---|
| Product Name | currentMeter |
| Asset Type | Device |
| Model | Current Meter |
| Data Type | JSON |
| Certificate-Based Authentication | Disabled |
| Description | None |
Step 4: Create Device Instances for the Ammeter
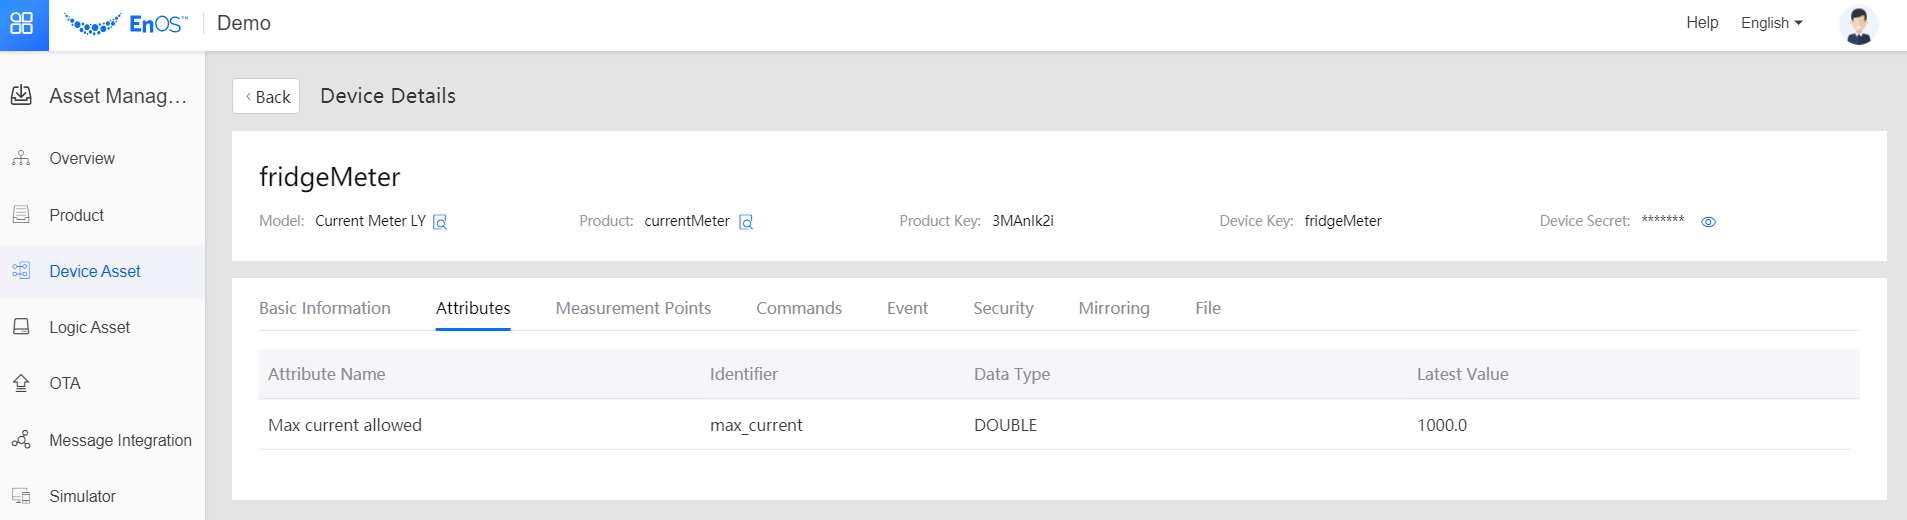
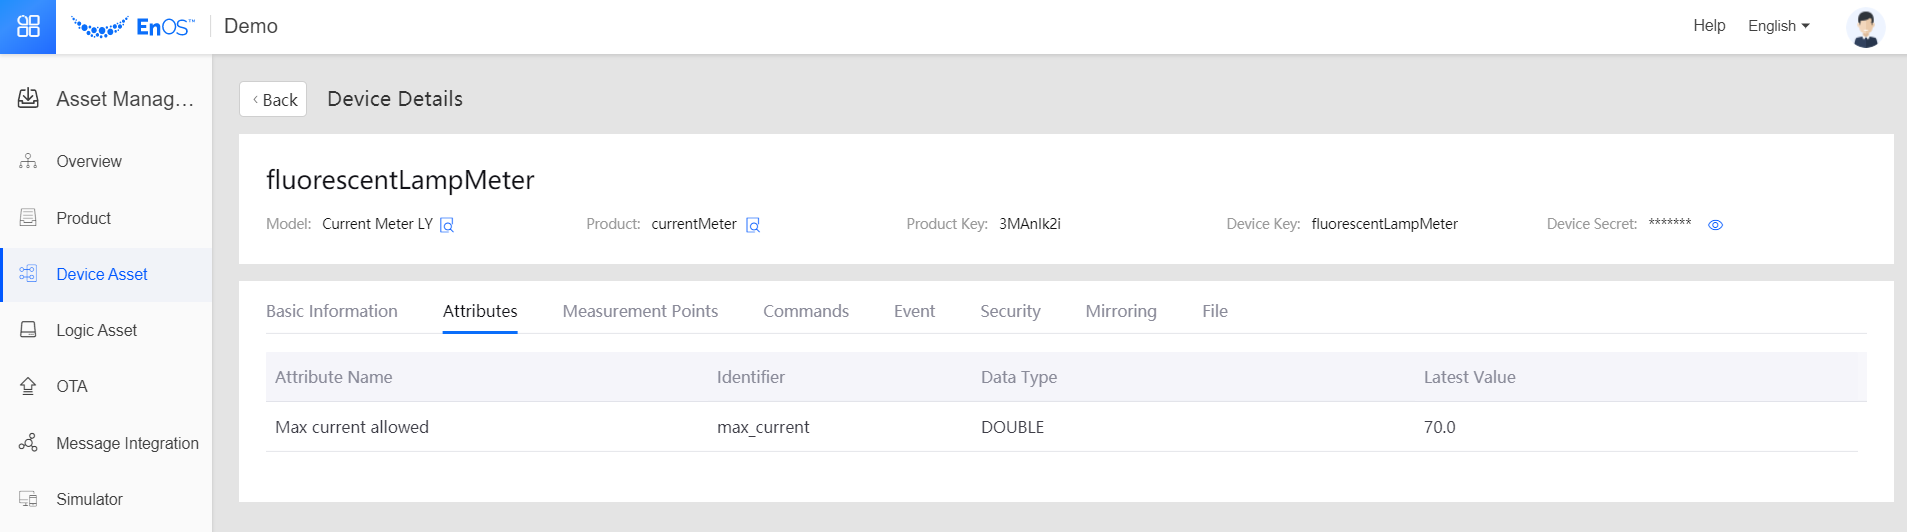
For steps on how to create a device instance, see Creating a Device. In this case, we need to create two instances, one for the fridge ammeter and the other for the fluorescent lamp ammeter. Define the instances as follows.
| Field | Instance 1 | Instance 2 |
|---|---|---|
| Product | currentMeter | currentMeter |
| Device Key | fridgeMeter | fluorescentLampMeter |
| Device Name | fridgeMeter | fluorescentLampMeter |
| Time Zone/City | UTC +08:00 | UTC +08:00 |
| Max Current Allowed | 1000 | 70 |

Step 5: Create Alert Information for the Instances
Define the following alert information for the two instances.
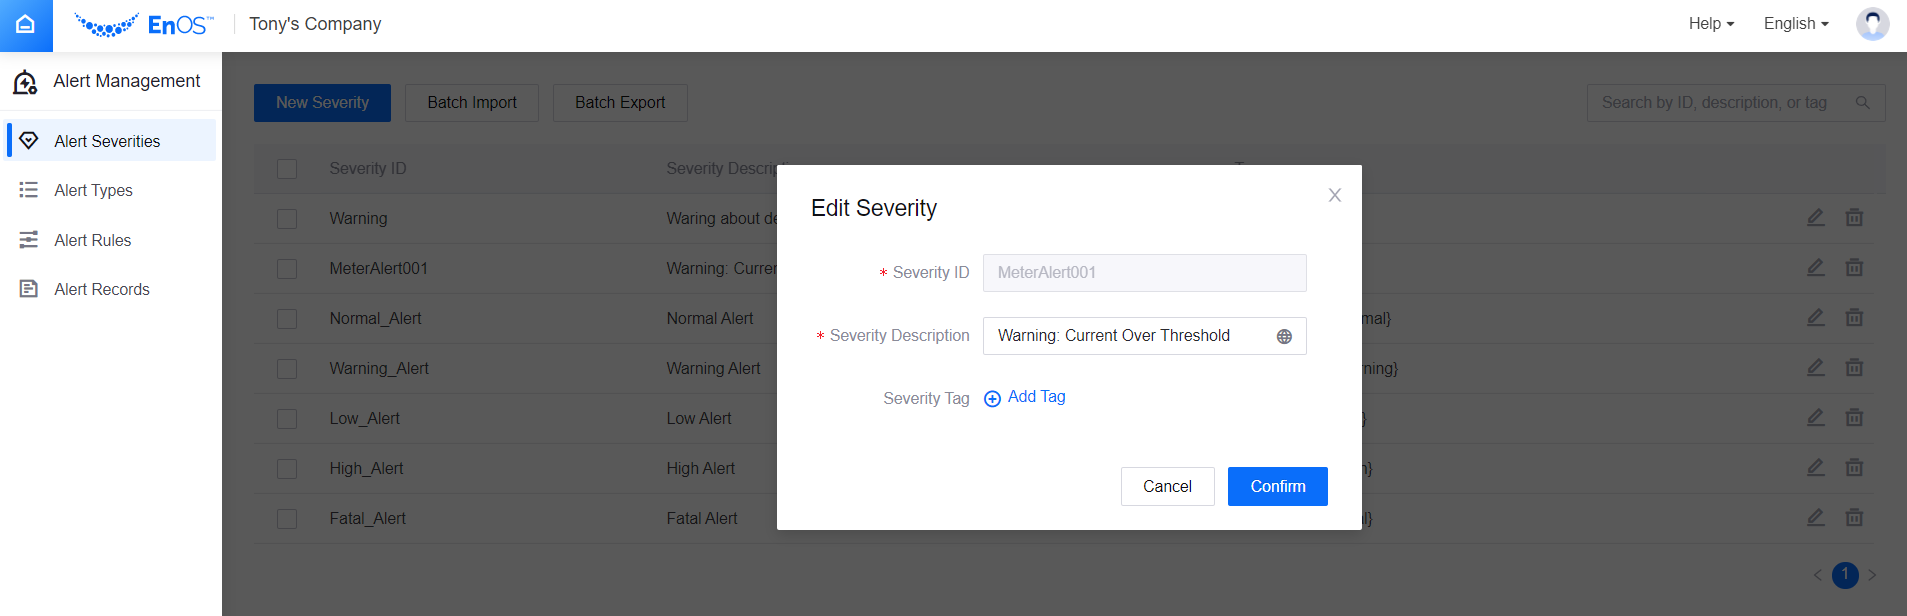
Create the alert severity. For steps on how to create an alert severity, see Creating Alert Severity. The following is a sample severity you can refer to.
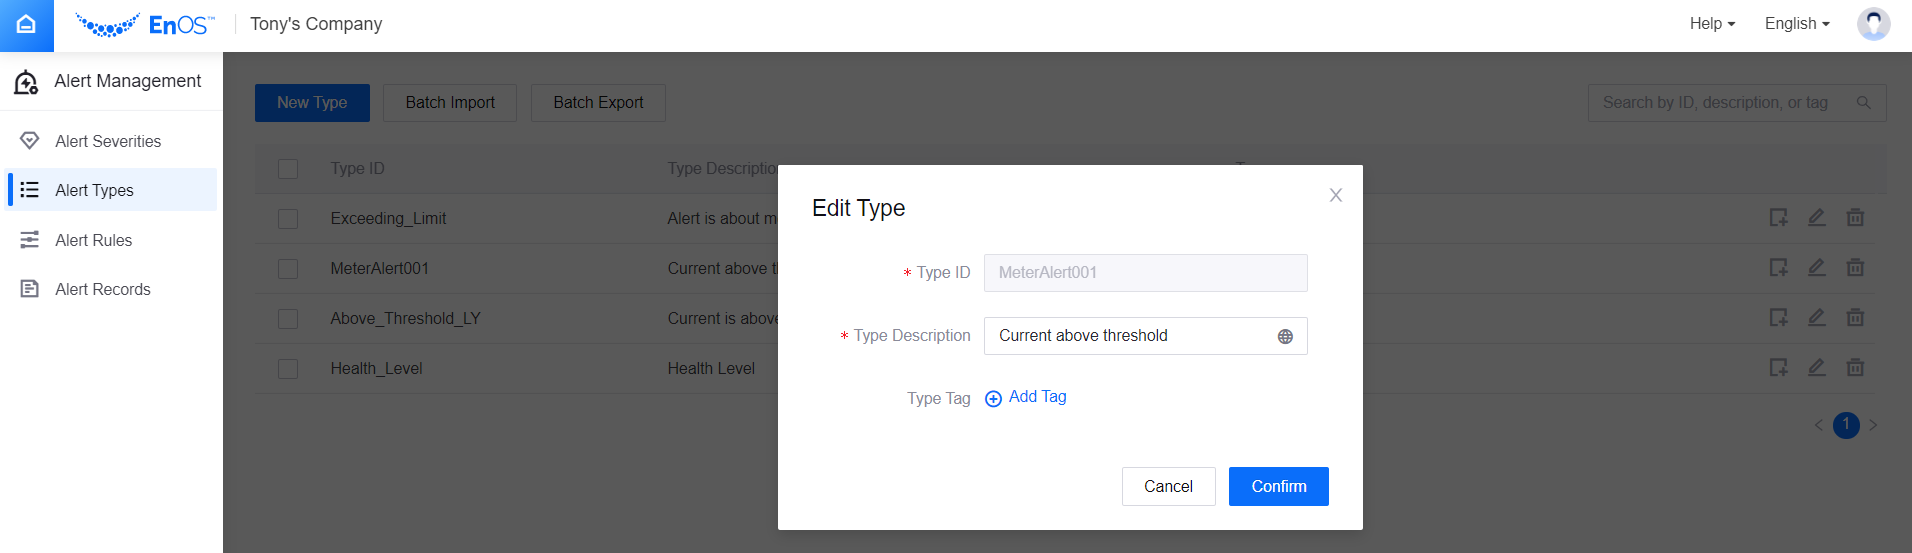
Create the alert type. For steps on how to create an alert type, see Creating Alert Type. The following is a sample you can refer to.
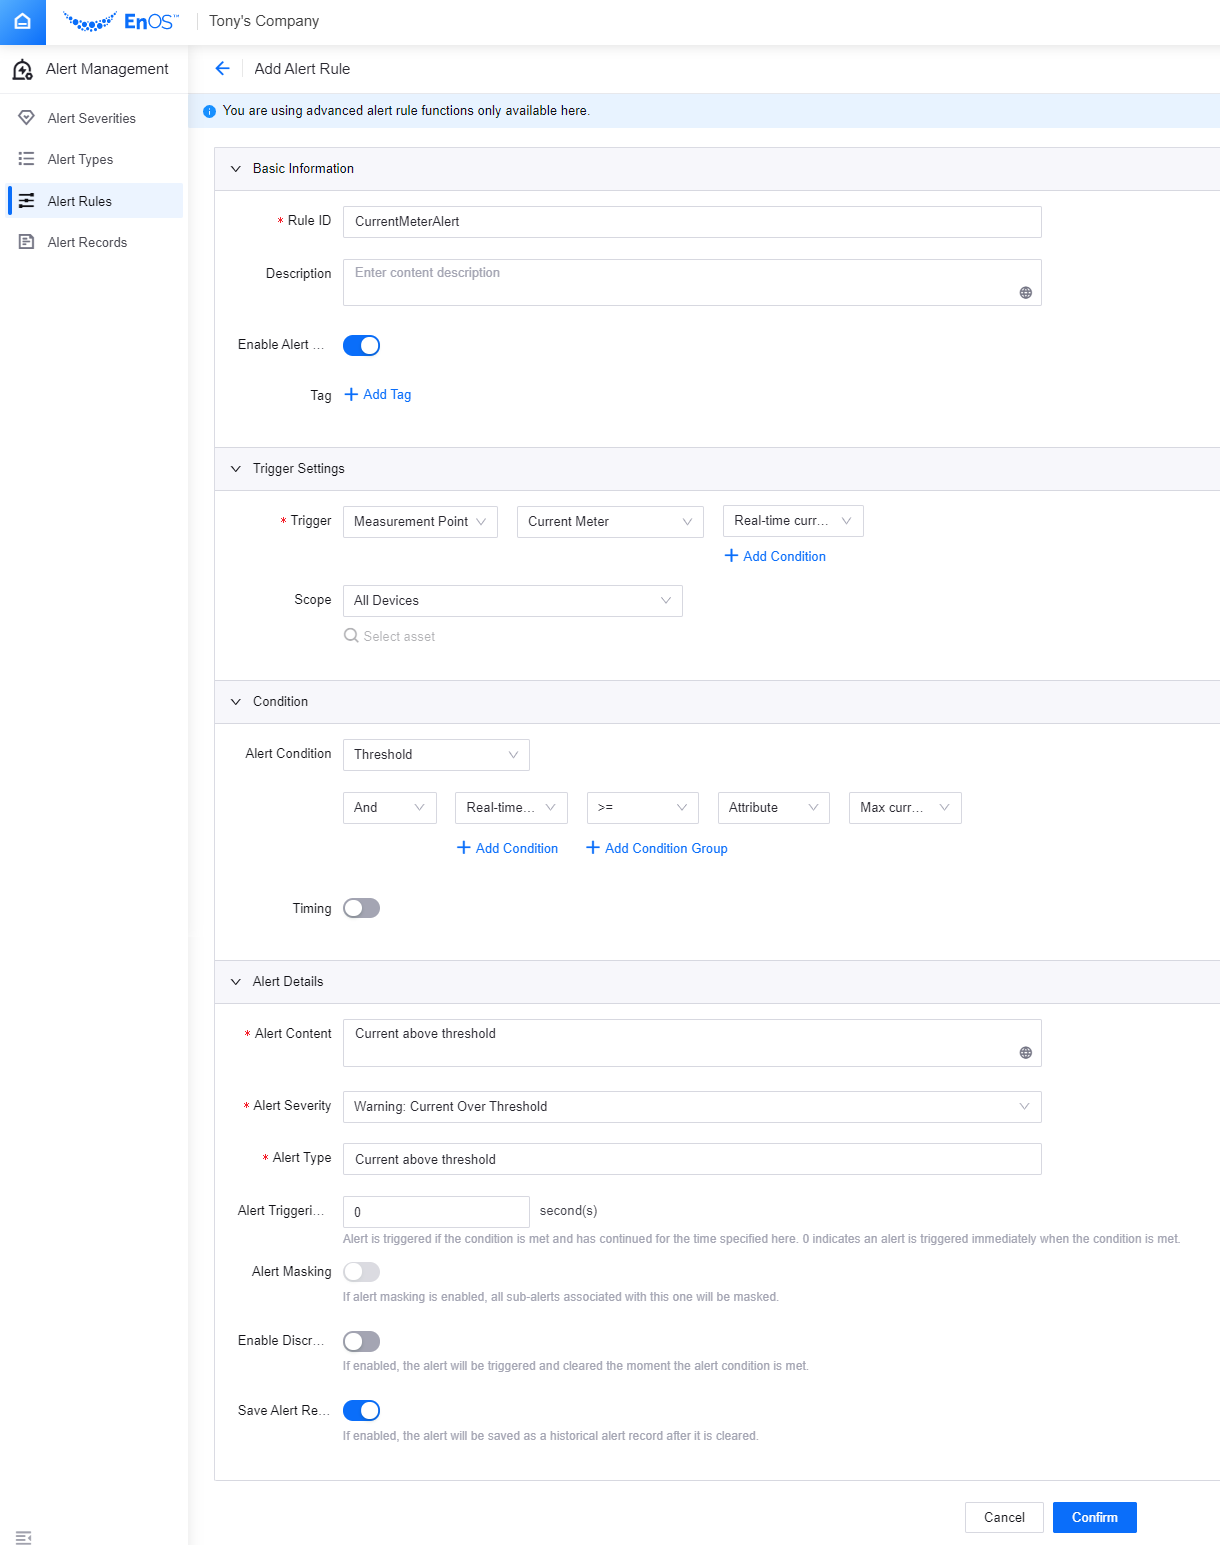
Create the alert rule. For steps on how to create an alert rule, see Creating Alert Rules.
Step 6: Use EnOS Java SDK for MQTT to Simulate Device Instances
In your IDE, create two Java classes: fridgeMQTT and lampMQTT. In the following sample code, the simulated fridge and lamp will have a current in the range of [0,1500]mA and [0,150]mA. Therefore, there will be a possibility that both devices will run a current that is above their Max Current Allowed value and thus trigger an alert. Copy the following sample code, replace the variants with your own settings and run the code snippets.
env:Replace it with your EnOS environment address.productKey:Replace it with the product key of the ammeter product.deviceSecret:Replace it with the device secret of fridgeMeter infridgeMQTTand fluorescentLampMeter inlampMQTT.
The sample code of fridgeMQTT is as follows.
import com.envisioniot.enos.iot_mqtt_sdk.core.IConnectCallback;
import com.envisioniot.enos.iot_mqtt_sdk.core.MqttClient;
import com.envisioniot.enos.iot_mqtt_sdk.core.exception.EnvisionException;
import com.envisioniot.enos.iot_mqtt_sdk.message.upstream.tsl.MeasurepointPostRequest;
import com.envisioniot.enos.iot_mqtt_sdk.sample.SimpleSendReceive;

import java.util.Random;

public class fridgeMQTT {
    public static final String env = "tcp://url:port";
    public static final String productKey = "productKey";
    public static final String deviceKey = "fridgeMeter";
    public static final String deviceSecret = "deviceSecret";
    private static MqttClient client;
    private static volatile boolean subDeviceLogined = false;
    private static Random random = new Random();
    private static int idInc = 20;
    private static final char[] HEX_CHAR = new char[]{'0', '1', '2', '3', '4', '5', '6', '7', '8', '9', 'a', 'b', 'c', 'd', 'e', 'f'};

    public fridgeMQTT() {
    }

    public static void main(String[] args) throws Exception {
        initWithCallback();
        alwaysPostMeasurepoint();
    }

    public static void initWithCallback() {
        System.out.println("start connect with callback ... ");

        try {
            client = new MqttClient(env, productKey, deviceKey, deviceSecret);
            client.getProfile().setConnectionTimeout(60).setAutoReconnect(false);
            client.connect(new IConnectCallback() {
                public void onConnectSuccess() {
                    SimpleSendReceive.subDeviceLogin();
                    System.out.println("connect success");
                }

                public void onConnectLost() {
                    System.out.println("onConnectLost");
                }

                public void onConnectFailed(int reasonCode) {
                    System.out.println("onConnectFailed : " + reasonCode);
                }
            });
        } catch (EnvisionException var1) {
        }

        System.out.println("connect result :" + client.isConnected());
    }

    public static void alwaysPostMeasurepoint() throws Exception {
        while(true) {
            long ts = System.currentTimeMillis();
            Random random = new Random();
            System.out.println("start post measurepoint ...");

            MeasurepointPostRequest request = MeasurepointPostRequest.builder().addMeasurePoint("rt_current", random.nextDouble() * 1500).build();

            try {
                client.fastPublish(request);
                System.out.println(" post measurepoint success...");
            } catch (Exception var3) {
                var3.printStackTrace();
            }
            System.out.println(client.isConnected() + " post  cost " + (System.currentTimeMillis() - ts) + " millis");
            Thread.sleep(10000L);
        }
    }
}
The sample code for lampMQTT is as follows.
import com.envisioniot.enos.iot_mqtt_sdk.core.IConnectCallback;
import com.envisioniot.enos.iot_mqtt_sdk.core.MqttClient;
import com.envisioniot.enos.iot_mqtt_sdk.core.exception.EnvisionException;
import com.envisioniot.enos.iot_mqtt_sdk.message.upstream.tsl.MeasurepointPostRequest;
import com.envisioniot.enos.iot_mqtt_sdk.sample.SimpleSendReceive;

import java.util.Random;

public class lampMQTT {
    public static final String env = "tcp://url:port";
    public static final String productKey = "productKey";
    public static final String deviceKey = "fridgeMeter";
    public static final String deviceSecret = "deviceSecret";
    private static MqttClient client;
    private static volatile boolean subDeviceLogined = false;
    private static Random random = new Random();
    private static int idInc = 20;
    private static final char[] HEX_CHAR = new char[]{'0', '1', '2', '3', '4', '5', '6', '7', '8', '9', 'a', 'b', 'c', 'd', 'e', 'f'};

    public fridgeMQTT() {
    }

    public static void main(String[] args) throws Exception {
        initWithCallback();
        alwaysPostMeasurepoint();
    }

    public static void initWithCallback() {
        System.out.println("start connect with callback ... ");

        try {
            client = new MqttClient(env, productKey, deviceKey, deviceSecret);
            client.getProfile().setConnectionTimeout(60).setAutoReconnect(false);
            client.connect(new IConnectCallback() {
                public void onConnectSuccess() {
                    SimpleSendReceive.subDeviceLogin();
                    System.out.println("connect success");
                }

                public void onConnectLost() {
                    System.out.println("onConnectLost");
                }

                public void onConnectFailed(int reasonCode) {
                    System.out.println("onConnectFailed : " + reasonCode);
                }
            });
        } catch (EnvisionException var1) {
        }

        System.out.println("connect result :" + client.isConnected());
    }

    public static void alwaysPostMeasurepoint() throws Exception {
        while(true) {
            long ts = System.currentTimeMillis();
            Random random = new Random();
            System.out.println("start post measurepoint ...");

            MeasurepointPostRequest request = MeasurepointPostRequest.builder().addMeasurePoint("rt_current", random.nextDouble() * 150).build();

            try {
                client.fastPublish(request);
                System.out.println(" post measurepoint success...");
            } catch (Exception var3) {
                var3.printStackTrace();
            }
            System.out.println(client.isConnected() + " post  cost " + (System.currentTimeMillis() - ts) + " millis");
            Thread.sleep(10000L);
        }
    }
}
Results
- Go to Alert Management > Alert Records.
- Enter the Rule ID and click Query.
You can see that the Current above threshold alerts are reported when the real-time currents of the two devices run above the threshold.
Next Step
You can configure the rule so that an alert is triggered if the rule is met and has continued for specified a time. For more information, see Tutorial: Setting Alert Triggering Delay Timer.